Struffoli for Christmas

0 komentar

Struffoli with Sprinkles


 Dough:                                                                                           
4 cups flour, sifted                                                                        
4 oz butter, softened                                                                   
3 whole eggs + 1 yolk, beaten                                                    
¼ cup sugar
1 oz liqueur (anise, rum, brandy, or Limoncello)

grated zest 1 orange and ½ lemon
Pinch salt
Pinch baking soda
1 oz milk
Syrup:
1 1/2 cups honey
1/2 cup decorations/sprinkles


For the dough:
In a bowl add and mix the flour, salt and baking soda. Make a little well in the center of the bowl.  Add remaining ingredients in the center.  Incorporate and mix batter until it is homogenized.  Knead about 5 minute until  the dough is smooth (if the dough is too tough, add a little milk, if it is too soft add a little more flour). Cover with towel or a bowl and allow to rest at least 30 minutes at room temp.
 

Mounded Struffoli


Once rested, divide into smaller pieces, and roll  each piece into thin long logs (thin snakes). Cut each thin  log into tiny ¼ inch pieces about the size of chick peas.  Set on a clean towel.
 
Prepare a medium size pan half filled with either vegetable, canola, or sunflower oil.  When hot, add a batch of struffoli at a time and cook.  Stir often and remove when the struffoli  are golden (not brown). Lay on paper towel to drain the excess oil. Continue the process until all the struffoli have been cooked.

 To make syrup:
Heat the honey  in a medium size pan for about 3 minutes.  Turn off heat and add the ready struffoli.  Mix gently and uniformly.  Transfer the struffoli to a dish and shape like a small mountain or a wreath.  Decorate with sprinkles. Allow to rest about an hour before serving. 

Struffoli Christmas Wreath

Alba on WUSA9 cooking segment December 18, 2012
Struffoli is a traditional Napolitan Christmas somewhat sweet dough that is fried first and then dipped with warm honey.  It can decorated with sprinkles, candied fruit and even silver and white almonds.

In Naples Struffoli were prepared by nuns in convents and given to noble families to thank them for their act of charity.

Enjoy making these delicious sweet morsels of sweet dough for your family like our grandmothers used to and make your own Christmas tradition.

Ricotta Cheese Cookies - Washington Post

0 komentar

Italian Ricotta Cheese Cookies


Ricotta Cheese Cookies


The Washington Post, December 12, 2012

Holiday Cookies 2012

  • Course: Dessert
  • Features: Make-Ahead Recipes, Holiday (Christmas)

Summary:

These Italian cookies are tender and caky, thanks to the ricotta, but not at all cheesy. They're so moist that other kinds of cookies stored with them will quickly turn limp –- something to keep in mind if you are giving them as part of an assortment.
The recipe makes a lot of cookies; it can easily be halved.
Because we think the holidays demand color, we tinted the glaze a bright, non-traditional blue. You can make it any color -- or leave it plain, which is traditional. Don't store the frosted cookies in an airtight container; the moistness of the cookies will cause the glaze to run.
MAKE AHEAD: The batter can be made a day in advance, covered with plastic wrap pressed directly onto the surface, and refrigerated. The cookies can be stored in a non-airtight container for 2 weeks.

Makes about eighty 1 1/2-inch cookies

Ingredients:

For the cookies
  • Pinch salt
  • 1 teaspoon baking soda
  • 4 cups flour
  • 16 tablespoons (2 sticks) unsalted butter, softened
  • 2 cups granulated sugar
  • 2 teaspoons vanilla extract
  • One 15-ounce container ricotta cheese
  • 2 large eggs, lightly beaten
  • Freshly grated zest of 2 medium lemons (4 to 6 teaspoons)
  • 1 teaspoon finely chopped fresh rosemary, or more to taste
For the glaze
  • 1 cup confectioners' sugar
  • Freshly squeezed lemon juice from 1 lemon (about 3 tablespoons)
  • Food coloring (optional)
  • Colored sugar sprinkles, for garnish (optional)


Directions:

For the cookies: Place racks in the top and bottom thirds of the oven and preheat to 350 degrees. Line 2 baking sheets with parchment paper.
Combine the salt, baking soda and flour in a medium bowl.
Beat the butter, sugar and vanilla extract in the bowl of a stand mixer or hand-held electric mixer on medium-high speed for 3 to 5 minutes, until light and fluffy. Add the cheese, eggs, lemon zest and rosemary; beat for 2 to 3 minutes, until thoroughly combined, scraping down the sides of the bowl as needed. With the mixer on low speed, gradually add the flour mixture and mix well. The dough should be slightly moist.
Drop the dough by teaspoonfuls onto the prepared baking sheets, spacing them about 2 inches apart. Bake for about 10 minutes or until firm, rotating the pans from front to back and top to bottom halfway through baking. The cookies should be golden on the bottom but remain white on top. Transfer to a wire rack to cool to room temperature. Repeat to use all of the batter.
For the glaze: Place the confectioners’ sugar in a medium bowl and stir in enough lemon juice to make a thick paste. Add the food coloring of your choice, if using, and stir to blend. Thin with enough additional lemon juice to create a glaze that can be brushed onto the cookies. Lightly coat or drizzle the top of each cookie with the glaze and add sprinkles or other decorations, if desired. Allow the frosting to dry completely before storing, loosely covered, for up to 2 weeks.


Recipe Source:

Adapted from a recipe by Alba Johnson, a cooking instructor, cookbook author and personal chef in Shady Side.

Tested by Jane Touzalin for The Washington Post.
E-mail the Food Section with recipe questions.
 

How to transform a normal sandwich into a "gourmet" panino?

0 komentar

Panino with smoked turkey swiss cheese fresh arugula and grape tomatoes

Let's begin by saying that there are no laws but only golden rules. A golden rule is always to use the principles of common sense and good taste. The perfect match is what you like. I don't want to give you the recipe for the absolute panino, but I’ll try to explain what makes a panino successful.
 
·        Buy the bread the same day from a bakery ant not wrapped in plastic on a shelf.

·        Be sure the bread is fresh by squeezing it; it should bounce back at the touch.

·        Before you begin assembling the panino, taste the bread determine what ingredients will taste good and fit in nicely in that bread.

·       Decide who the star of the panino is going to be before buying ingredients.  Is the star the bread? The filling? The olive oil? The condiments? The entire panino?

·        Use only good quality cold cuts that have been just sliced that day, no cold cuts in plastic covers for our panini.

·        Use good quality, ripe, and fresh vegetables such as tomatoes, peppers, lettuce, arugula, spring onions, caramelized onions, etc.

·        Make your own dressing with a good quality olive oil.

·       Experiment by using other types of dressing such as freshly made hummus, balsamic and olive oil dressing, garlic and saffron mayo, a light pesto, lemon and garlic, and more. Stay away from dressing in jars or bottles.

·       Make sure that you have enough ingredients that compliment the bread, but not so much that you cannot balance and eat with 2 hands.

·        Make mini sandwiches using various ingredients to test until you achieve what you love best.

·       Once you have achieved success, have a panini party and invite your favorite people.  Pair it with a good beer or wine.


Pork and Black Bean Stew

0 komentar

Pork Chorizo Black Bean Stew

4 tablespoons olive oil, divided
1 large onion, minced
1 pound pork tenderloin, cut into 1/2 inch cubes
4 cloves garlic, minced
Large pinch red pepper flakes
1 large can black beans, drained, rinsed, and divided
1/4 cup water
3 chorizo sausages cut into 1/2 inch thick pieces
1 1/2 cups chicken stock
2-3 bay leaves
Salt and pepper to taste


Directions:
Heat 2 tablespoon oil in a large skillet over medium heat, stir in onion, and cook a few minutes until the onion softens and turns translucent. Remove the onion, and transfer into a large saucepan.
Browning the pork tenderloin and garlic

Add the remaining oil into the skillet, and place over medium-high heat. Add cubed pork, and cook until well browned.  Season with salt and pepper; add the garlic and red pepper flakes. Sauté for a minute, just until golden.  Transfer to the large saucepan with the cooked onions.

Chorizo
Pour 3/4 of the black beans along with 1/4 cup water into a food processor, and pulse a few times until crushed, but not creamy. Pour bean puree and remaining whole beans into saucepan along with pork and onions.  Add the chorizo, chicken stock and bay leaves. Bring everything to a boil over medium-high heat, then reduce heat to medium-low, cover, and simmer 30 minutes.  Taste and season with salt and pepper if needed.

  
Adding the black beans

This is a tasty winter comfort dish from Brazil.  I have enjoyed it many times at my Brazilian sister-in-law’s house, now I decided to make it and teach others how to make and enjoy it in my cooking classes.  Serve it with an aromatic jasmine rice, Delicious! 

Tip:  If you do not like Chorizo, you can substitute with Italian sausage.


Gluten-Free Brazilian Cheese Puffs (Pao de Queijo)

0 komentar

Gluten-Free Brazilian Cheese Puffs


Gluten-Free Brazilian Cheese Puffs (Pao de Queijo)

4 tablespoons Canola oil
½ teaspoon kosher salt
6 tablespoons water
1 2/3 cup tapioca flour          
1 large egg, beaten
6 tablespoons Greek yogurt
1/2 cup freshly grated Romano cheese, more for topping

Directions:
Preheat  oven to 450F.  Lightly spray a baking dish.

In the microwave or in a small pot on the stove-top, combine oil, salt, and water and bring to a boil. Remove from heat, and transfer to a food processor. Slowly add the tapioca flour, and pulse several times until it becomes a stiff dough. Cool slightly.
Gluten-Free dough - Using Tapioca Flour and Greek Yogurt

 
Add to the food processor, the egg, yogurt, and cheese, and mix well until dough is softer. Lightly coat your hands with oil and form dough into 12-16 small balls. Spinkle some extra cheese on each puff and place on a baking sheet in the oven. Lower the temperature to 350F, and bake until balls are puffy and golden, about 18-20 minutes, depending on the size of the dough.  
 
Pao De Quejo - Baked until golden
 
A few years ago, I tasted for the first time, Pão de Queijo, a traditional and delicious Brazilian treat, a tiny cheesy puff morsel from heaven.  From that first taste on, I was hooked.  My sister-in-law, who is Brazilian, brought these delicious treats to every family party. When I received the recipe, I made them and was discouraged by a lumpy dough outcome. I recently was asked to make these treats for my Brazilian cooking class, so I decided to use my culinary instinct and test the recipe using a food processor. The result was a soft and silky dough without the manual labor. 
 
My adaptation from the traditional recipe is using Greek yogurt instead of milk, Romano cheese instead of Parmesan cheese, and a food processor instead of mixing my hand.  Now that I have the technique down, there’s endless opportunity for variations for this recipe  Using a strong dry cheese is important, because these treats take on the flavor of whatever is added to the dough. Once baked, the dough is slightly gooey inside, with a burst of cheesy goodness flavor. 

 
Here are some variations:
Finely chopped rosemary or thyme
Finely grated gruyere cheese or extra sharp cheddar

 
Tip: These tasty cheesy treats can be baked on a baking sheet about an inch apart, or in a mini-muffin pan.  Be sure to lightly spray either pan.  
 

Easy Thyme and Shallot Flavored Butter

0 komentar


2 cups heavy cream                                       
1 shallot, finely minced
2 tablespoons fresh thyme, minced
1 small chili pepper, remove seeds and finely minced
Pinch kosher salt
Freshly ground black pepper

 Directions:

1.      Pour 2 cups heavy cream in a food processor. Put the lid on, and process.  The cream will go through various stages, from soft to silky whipped cream, and later it will become a firmer cream. At the last stage, the butter is yellow and has separated itself from the milk which is now, buttermilk. The process is working.
 
2.      Drain the butter from buttermilk. You can reserve the buttermilk for other uses in frig. While the butter is draining, mince the shallot, thyme, and chili pepper.  
 
3.      Once the butter has drained, transfer it to a bowl, add your chopped ingredients, a pinch of salt and pepper and mix everything up. Transfer the butter mixture to wax paper and roll to form a log.  Wrap tight, on each end, label it if you are going to freeze it.
Thyme Shallot Flavored Butter


There is an endless list of ingredients that can be used to make savory and sweet butters. Once you have the process down, the rest is easy.  You can create many flavored butters for breads, seafood, steak, and many other dishes.


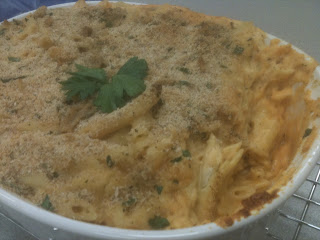
Baked Penne and Fontina Cheese

0 komentar


Baked Penne and Fontina Cheese
 
1 pound ziti or your favorite short pasta                          
8 tablespoons unsalted butter, divided                               
1 cup heavy cream                                                                 
1 cup buttermilk                                           
2 cups shredded Italian Fontina cheese                             
Salt and black pepper to taste
Pinch freshly grated nutmeg
1/2 cup breadcrumbs
1/4 – 1/2 cup grated Parmesan or Romano cheese
2 tablespoons chopped parsley

Directions:
Preheat the oven to 350F. Buttered a deep baking dish.

Cook the pasta according to package directions, less 3 minutes of al dente. The pasta is going to continue to cook in the oven, so you don’t want to overcook it. Drain and set aside.

Cut 5 tablespoons of the butter into tablespoon portions. Cut the remaining 3 tablespoons of butter into 1/2 inch cubes.

Warm the cream and buttermilk in a small pan, then cover and set aside to keep warm.

Stir the pasta with the 5 tablespoons of butter in a large bowl. Pour in the warm cream and buttermilk, and fold in the Fontina until it starts to melt. Add the grated nutmeg, and season to taste with salt and pepper.

Spread the pasta mixture into the buttered baking dish. Top with breadcrumbs and grated cheese. Top with 3 tablespoons of cubed butter over the top. Bake for 20-22 minutes, or until the top is slightly browned. Sprinkle fresh parsley over the top, and serve hot.
 
Fontina
 

Fontina Cheese is an Italian cheese produced in Valle d'Aosta, Italy, surrounded by the Alps. It is a medium hard cheese made from cow's milk. It is a cheese that can be eaten on its own, or paired with melons, apricots, cherries, apples or pears. It is also a cheese that melts easily and used for many baked pasta or vegetable dishes. It has a mild delicate flavor with a delicate nuttiness and a hint of mild honey. When melted the flavor is earthy with a taste of mushrooms.


Spicy Mediterranean Lentil Stew

0 komentar

Spicy Lentils

1 1/2 cups small lentils
5 cups water
Kosher salt to taste
2-3 tablespoons extra virgin olive oil
1 onion, diced  
2 cloves garlic, minced
1 medium green bell pepper, diced
3 medium tomatoes, diced
2 teaspoons ground cumin
1 teaspoon paprika
2 teaspoons ground coriander

1/2 teaspoon turmeric
1/4 teaspoon red pepper flakes

Freshly ground pepper
1 cup chicken or vegetable broth
1/2 cup chopped fresh cilantro


Directions:

Boil 5 cups of water and add the lentils.  Let simmer for 25-30 minutes or until tender.  Add the salt toward the end of cooking.  Strain well when ready.

 
In a large heavy bottom saucepan, add the olive oil and sauté the onion on medium heat until soft, translucent and just about to turn golden.  Add the bell pepper and sauté for 5-6 minutes; add the tomato and sauté 2-3 minutes.  Lastly, make a little room in the middle of the pan and add the garlic.  Sauté the garlic for 45-60 seconds. 

 
Add all the spices, saute 1-2 minutes, and stir well. Transfer the cooked lentils to the saucepan.  Add the broth and simmer for 4-5 minutes. Taste first, if needed add salt and pepper. Remove from heat and add the fresh cilantro to the stew.  Serve as a side dish or vegetarian entrée with rice, pita bread or crusty bread, or with a little Greek yogurt on top.

lentils

I cook the lentils separate because if I cook the lentils with the spices and vegetables, the vegetables and spices become a little diluted and less flavorful. That’s my way of making this dish extra flavorful… an extra step... it’s worth it!


Baked Vegetable and Ricotta Frittata

0 komentar

Baked Vegetable Frittata
 
2-3 tablespoons extra virgin olive oil
1 onion, minced
2 garlic cloves, minced
1 medium zucchini, shredded with large side of cheese grater
1 medium yellow squash, shredded with large side of cheese grater
1 medium red bell pepper, seeded, cut into small dice
Kosher salt
Freshly ground black pepper
1 (10 oz.) package frozen spinach, defrosted, squeezed dry
2 cups frozen peas, defrosted
1 cup frozen corn, defrosted
1 cup broccoli florets, blanched 
8 large eggs, well beaten
1 cup whole ricotta cheese
3 tablespoons fresh basil, minced
2 tablespoons fresh mint, minced
1 cup grated Parmesan or Romano cheese
Grater for Vegetables
 
 
Directions:
1.      Preheat oven to 350ºF. Line a 9-by-13-inch baking dish with foil or parchment paper, leaving a 2-inch overhang on each short side. Coat the surface of the paper with olive oil so that the frittata will not stick.
2.      Warm oil in a skillet over medium heat. Add onion and sauté 5-6 minutes until translucent. Add the garlic and sauté about 45 seconds. Next, add the zucchini, squash and bell pepper. Season with salt and pepper. Sauté for 5-7 minutes. Add spinach, peas, corn and broccoli; sauté about 3 minutes. Season with salt and pepper.
3.      Whisk eggs, ricotta, basil, mint and Parmesan. Stir in vegetables. Pour into dish and sprinkle more grated cheese on top. Bake until a toothpick inserted in center comes out clean, about 30 minutes. Let rest about 10 minutes. Using foil or parchment paper, transfer the frittata to a cutting board. Cut the frittata and serve warm or at room temperature.
 
What an incredibly delicious and healthful recipe.  This recipe can be served as an appetizer, entree, tapas warm or cold.

Pasta with Zucchini Garlic and Basil

0 komentar

Pasta with Zucchini and Basil

1 pound linguine or spaghetti
4-6 tablespoons extra virgin olive oil
2 large zucchini, thinly sliced
4 garlic cloves, minced
Salt and pepper to taste
10-14 fresh basil leaves, torn
Freshly grated Parmesan cheese for topping


Directions:
Bring a large 5-6 quarts pot of salted water to a boil, add the pasta and cook until al dente.
 

In large skillet, heat 4 tablespoons of oil and add the sliced zucchini. Cook on medium heat until the zucchini slices are golden and fragrant. Do not overcrowd the skillet with the zucchini slices or they may become too soft. If you do not have a large skillet, you can either cook the zucchini in 2 skillets or in 2 batches for best flavor. Stir occasionally to allow the zucchini to become golden on the bottom of the pan.. If the zucchini appear to be a little dry, add a drizzle of extra oil and continue cooking. The zucchini should be slightly golden and barely crispy.
 

Once the zucchini are ready, add the garlic, salt and pepper and sauté for a minute. Taste for seasoning and adjust with salt and pepper as needed. Remove from the stove, add fresh chopped basil and fold.
 

When the pasta is ready, strain and transfer to the skillet with the zucchini. Fold gently, add a drizzle of olive oil and freshly grated Parmesan cheese.
Zucchini


This is a simple an easy dish to prepare in less than half an hour using ingredients from your garden. It's a delicious summer pasta dish. Be sure to cook the zucchini on medium and not on high heat, or they may become slightly bitter.  Be patient when cooking the zucchini, the extra effort will result in better flavor.

A Good Espresso with Orange Zest Sugar

0 komentar

Espresso with oranze zest sugar

Selecting the right espresso coffee

We think that the darker the beans, the better the taste of espresso. Dark roasted coffee beans could make espresso taste a little bitter. Coffee beans should roast slowly and gently for a more sweet flavor and smell. Purchase good quality slow roasted coffee beans to make a good espresso. I am very lucky to have coffee sent to me by relatives in Italy or France.  However, when I run out, I search for the best coffee I can find.  I will purchase a ¼ pound of coffee in coffee shops or specialty store.  It’s an adventure that I like to have fun with, so I purchase a small amount, taste it, critic it, and then decide whether I will purchase that coffee again or not.
 
Making espresso

I am not by any means a coffee snob, but I do enjoy it. I refuse to purchase an expensive espresso maker that you must know the exact pressure and water temperature.  I don’t like reading manuals. That’s not for me; I use the old fashion Italian coffee pots that go right on my gas burner. I’ve been making my coffee this way for many decades and my parents and grandparents before me. If the coffee pot ain’t broken, why change it?

I do like to grind my own coffee right before I make a pot of coffee. I believe the beans stay fresher and moister until right before use.  I love my ritual of filling the bottom of the espresso pot; adding the ground coffee without pushing down on it too much.  I make sure the pot is screwed on just so, not loose and not too tight. I place the espresso pot on the burner at medium-low heat and wait for that wonderful perky sound that let’s me know that my coffee is almost ready.  Then I close my eyes and enjoy talking a deep breath as I smell the wonderful aroma of freshly brewed espresso.  Ahhh!


Drinking espresso

There is a rule in Italy, that milk does not have a place in an espresso cup.  Milk is meant to co-exist in a cappuccino and not  an espresso.  If you want to stay true to that rule, drink espresso without milk, add a little sugar, stir, and enjoy!

I like to add orange zest to my sugar jar and allow it to aromatize my sugar.  I use this sugar to sweeten my espresso coffee.  This extra little step, takes my experience of enjoying my espresso to the next level.  

Italian Espresso Pot


Pasta with Calabrese Meatballs

0 komentar

Calabrese Meatballs


½ - 1 cup Italian breadcrumbs
¼ cup or more milk
1 pound ground beef  (or half pork, half beef)
5 garlic cloves, minced and divided
2 medium red onions, shaved and divided    
½ bunch fresh Italian parsley, minced
1 large Egg
½ cup grated cheese
Salt and pepper to taste
2-3 tablespoons extra virgin olive oil
1 large carrot, minced                                                           
1 celery stalk, minced                                                
1 (28 ounces can) tomato sauce
1 pound short pasta such as rigatoni, penne
12-14 large basil leaves, torn


Directions
In a bowl add the breadcrumb and milk. Mix well and strain any access milk thru your fingers. Transfer mixture to a larger bowl.  Add the meat, 2 garlic cloves, 1 onion, parsley, egg, grated cheese, salt and pepper.  Mix well and shape meatballs any size you like. Set on a platter.


In a large sauté pan, add the oil, 1 onion, 3 minced garlic cloves, carrot, and celery and cook until golden.  Add the meatballs to the pan and sauté until golden on all sides. When ready, remove the meatballs for a moment. Next, add the tomato sauce, basil, salt and pepper. Cook the sauce for about 5 minutes and return meatballs to pan. Cook until the meatballs are cooked thru and the sauce is well seasoned about 10-15 minutes depending on size of meatballs.


In a large 5-6 quart pan, cook the pasta in boiling salted water until al dente. Strain and transfer to a large pasta bowl.  Add some sauce and mix well. Serve In individual plates, add meatballs and sauce on top.  Garnish with fresh basil, cracked pepper and grated cheese. Serves 4-6

penne

I made this dish in my June cooking class. The was a moment of silence while people were eating it. My grandfather would say that it is a sign that people are truly enjoying their food. It was a sucessfull recipe that I know many students will make for their family and friends.

 
  • Cooking Chef Show © 2012 | Designed by Rumah Dijual, in collaboration with Web Hosting , Blogger Templates and WP Themes