Chickpeas Onions and Soft Dates

0 comments


Health benefits of dates: 7 reasons to include dates in your diet 

Chickpeas Onions and Soft Dates 

3 cups cooked chickpeas 
2 tablespoons extra virgin olive oil
2 tablespoons unsalted butter
1 small sweet onion, finely diced
2 tablespoons tomato paste
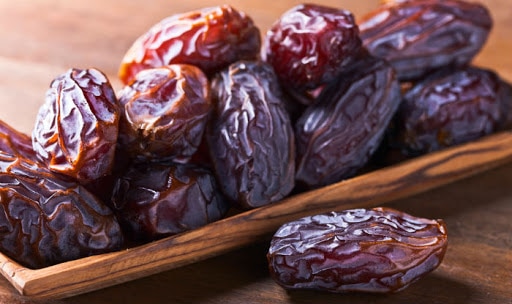
10 large soft dates, pitted and chopped
1 teaspoon ground cardamom
1 teaspoon ground cumin
1 teaspoon ground coriander
Kosher Salt
Black pepper
Red pepper flakes, optional

1.     If using caned cooked chickpeas, drain only do not rinse and set aside.
2.     Combine all spices in a small bowl.
3.     In a medium skillet over medium heat, heat the oil until it begins to shimmer. Add the onions and sauté for a few minutes, until they have softened and just beginning to turn golden. Move the onions to one side of the pan; add the tomato paste in the center of the pan and stir to flatten the tomato paste.  Allow tomato paste to roast about 2 minutes. Add the spice mixture and let toast for a minute.  Stir the onions, tomato paste, and spices together.
4.     Add the chickpeas, dates, and 1 cup of warm water. Cover and simmer the mixture for 15 minutes, stirring occasionally to combine the flavors. Cook until the dates have softened and the chickpeas are tender.  You can add a splash of warm water if the pan gets dry. Serve warm.


      This is a North African recipe that combines naturally sweet dates with savory chickpeas and onions with fragrant spices used to season this delicious dish.  It can be served as a meal from vegetarians, vegans can exclude the butter, and it can be eaten by all as a side dish.  

Swiss Chard and Onion Pie

0 comments


2 ready-made pie dough, thawed          
1/2 bunch Swiss chard or Tuscan Kale  
2-3 tablespoons extra virgin olive oil      
1 large sweet onion, diced or grated                
2 cloves garlic, minced                                   
Sea salt
Red pepper flakes
Black pepper
Drizzle balsamic, optional

1.     Preheat oven to 375F.  Line a baking sheet with parchment paper.
2.     Preparing filling: Remove tough stems from the greens; break the leaves with your fingers. (no need to cook)
3.     In a large skillet add the oil and onions; cook until translucent and soft 8-10 minutes. Add the garlic, salt, pepper, red pepper flakes; cook another 2-3 minutes. Mix well, and set aside.
4.     Rolling the dough: Roll the first dough to your desired size (the thinner the better). Transfer the rolled-out dough to the baking sheet; add the filling, making sure it's spreads out evenly to the edges of the dough. Roll out the second piece of dough the same way and place it over the dough with filling. Using a rolling pin, press the two layers of dough together over the filling, pressing out as much air as possible and tightly sealing the edges.
5.     Baking the dough: Make a few small holes on the top of the pie with a fork.  Bake about 20 minutes, or until golden. Cut into diamonds and serve warm drizzled with extra virgin olive oil if desired or balsamic.

This pie can be make with spinach, leeks, and fresh herbs as well.
Minimum effort lots of flavor!


WHICH SALT DO I USE?

0 comments


Which salt do I use?
Once we had only two choices, fine and coarse salt. In recent years, more and more enriched varieties of salts are available for cooking. Some markets now offer a variety of salts recognizable by color, exotic background, origin, properties, and price.  

The Blue Salt: The rarest one is probably the blue salt from Persia. It comes from the salt mines of Iran; it is rich in potassium, tangy, and slightly spicy. It is used to season and to decorate refined dishes.

The Himalayan Pink Salt: The Himalayan pink salt is crystal clear and, has rich sources of natural elements and minerals.  It is not treated chemically and is particularly digestible. In addition to cooking, it is used for spa treatments.

The Hawaiian Red Salt: The richest in iron is the Hawaiian red salt; it owes its color to the volcanic clay from which it came. The flavor is most pronounced when used on grilled or roasted foods.

The Grey Salt from Brittany: The poorest salt is the grey salt from Brittany, manufactured within clay buildings along the Atlantic coasts of France. Rich in minerals, it is especially suited for steamed or boiled vegetables.

The Black Cyprus Salt: The most detoxing is the black Cyprus salt; black because it is enriched with charcoal. It is used to decorate and flavor food like sweet potatoes, white fish, and eggs.

The Smoked Salt of Denmark: It is not as famous because of its color, but still tasty.

Fleur de sel (flower of salt): A finishing salt and one of my favorites is Fleur de sel. A raw and unrefined salt, that comes from the Camargue in southern France.  It is much loved especially by chefs. Slightly bigger than regular salt and somewhat damp to the touch. It is also produced in Italy, Portugal and a few other countries. I use it raw, in its natural state. I add it to oranges, lemons, and mandarin peels.  I also use it on chocolate, with herbs, on salads, roasted vegetables, and uncooked sauces or soups. 

The Iodized Salt: Then there’s the grand iodized salt, not my favorite salt. This salt is found in salt shakers, put on plates and used to prepare foods. It is one of many products born in the era of industrialization. This salt does not exist in nature; so I never use it.


The Kosher SaltMost popular in the United State is the Kosher Salt. It is opaque because it is not bleached. I use it for salting pasta water, roasting vegetables, soups, stews, and grilling. I use it on top of focaccia or pizza to make a special crispy crust.

Why It's Better to Eat Products in Season

0 comments


Fruits and Vegetables in Season

Today with the arrival of modern greenhouses and new shipping means, nearly all fruits and vegetables can be eaten year-round. However, once on our table, the taste of fresh vegetables or fruit cannot compare to the ones that have been refrigerated in compartments for weeks or even months.  By being exposed to natural light, rather than artificial cold, the vegetables contain their antioxidants that come from the sun and bring their many benefits to our entire body.  Changing the foods on our table according to the seasons also means diversifying in the intake of vitamins, minerals and other nutrients that our body needs, especially if we choose organic products.

 If we want to experience the heart and soul of what makes food divine, we have to eat what’s in season. This is a deeply ingrained value that I inherited. Mediterranean cooking is considered a sustainable regimen that respects the environment and its cultural traditions. The secret lies in its local, and, most importantly, seasonal ingredients. Eating seasonally means you’re eating fresh ingredients at the height of their flavor. This experience impacts the desire to go back to jarred food or deep frozen ingredients that may have been preserved for months or years.  If you eat the right ingredients in the right months, you will experience the very best of a cuisine.  What better way to experience one of the world’s greatest cuisines than to approach it with the care and respect that it deserves?

Important aspects to understand related to fruits and vegetables in season:


Taste and Aroma: Choosing fresh products that are harvested according to their natural maturation are remarkable assets to our palates. Freshly ripened fruits and vegetables have an unparalleled flavor, have their own characteristic aroma, and are much more colorful. Out-of-season products leave a lot to be desired with regard to quality and taste. It is preferable to follow the natural cycle of fruits and vegetables.

Environmental Choice: Include fruits and vegetables that are environmentally friendly. The growing of fruit and vegetables out of season increases the pollution on our planet. The increased pollution is due to the industrial process which involves the use of artificial energy, often coming from fossils fuels, to heat and keep greenhouses lighted. In addition, products out of season are often imported from other states or countries, whereby even transport methods can produce pollution.

Nutrition: Seasonal fruits and vegetables are more nutritious. They follow their natural cycle so they are richer in essential elements for the well-being of our body. Fruits and vegetables need the ability to grow on their vine as nature intended. This means they will contain larger amounts of vitamins and minerals which is essential for health.  Purchasing directly from local or nearby merchants is an advantage to us, because purchases are made at zero or short distances, yielding reduced usage of transportation.

Reduction of pesticides:  Products grown in season and organic will have much lower quantities of pesticides. The vegetables and fruits that are forced to grow, not according to their natural cycle, appear weaker and therefore are more vulnerable to insects.

Lower Price: Non-seasonal fruits and vegetables cost more because they are imported and transported for long distances which carry an increased cost to consumers.


Feta Baked in Vine Leaves

0 comments

Feta baked in vine (grape) leaves 

The word “Dolma” comes from a Turkish verb which means to roll up. Vine leaves are a mix of fruit and vegetable that are rich in vitamin A, K, E, C, and magnesium. 

Vine leaves are not just for boiling and stuffing with rice and meat.  They can be served as an appetizer, entrée, or side dish. They can be baked, boiled, steamed, grilled, used to wrap fish or meats, and to make a pesto.  I made these little parcels for a holiday.  They can be prepared ahead and then baked at the last moment.  Hope you try them!

lightly boiled vine leaves


16 grapevine leaves from a jar  
1 thick slice feta cheese, cut into small cubes
Zest 1 Lemon
1 large clove of garlic, grated
Red pepper flakes
1 teaspoon dried oregano
Drizzle of extra virgin olive oil

Preheat oven to 350F. Line a baking sheet with parchment paper.

Gently blanch the vine leaves in boiling water for 20 seconds. Carefully and delicatly transfer leaves to a bowl of cold water. Remove from bowl and pat dry. Snip off the stems and discard. 

Arrange leaves on work surface overlapping into a star shape. Be sure the rough side is up. The soft side will be on the outside which will be cooked.  Place a cube of feta in center.  Add a little grated garlic, lemon zest, a sprinkle of red pepper flakes and oregano, and a tiny drizzle of olive oil.  

Fold into a parcel one at a time until fully wrapped. Place parcels on the baking sheet and drizzle a few drops of olive oil on top of each. Bake about 15 minutes until the cheese is soft.  Rest a few minutes before serving.

Note: you can also make larger parcels using a whole slice of feta wrapped with more leaves. 


Zuccotto Cake for Festive Occasions

0 comments


Zuccotto Cake for Festive Occasions  

Zuccotto, a Florentine cake, was presented for the first time at Caterina de Medici's court during a banquet held for distinguised Spanich visitants. It is believed that a famous Italian artist named this dessert, Elmo di Caterina (Caterina's helmet).  The cake shape resembled an infantry helmet of that time known as a Zuccotto. Given its royal origins, the Zuccotto has survived many centuries; it’s a timeless dessert with a vintage appearance. Some ingredients have changed over time; however the objective of making this unique and noble dessert is to keep the flavors simple and the ingredients few. This is my version of a simple Zuccotto: 


Zuccotto Cake for Festive Occasion
2 (12-ounce) rectangular pound cakes
1/4 cup amaretto, rum or other liquor for brushing
2 cups heavy whipping cream
1 cup frozen strawberries, thawed and crushed
1/2 teaspoon almond extract
1 cup toasted sliced almonds
Additional whip cream for topping

Cover a large bowl with plastic wrap and let the wrap hang over the edges. Slice the pound cake into thin slices. Cover around the bowl with the pound cake slices starting with the center. Save some slices for the top. Brush the cake with liquor of choice.
In a dry cold metal bowl, whip the heavy cream with almond extract until thickened. Fold in the crushed berries into whip cream. Spread half of the mixture of the whip cream mixture into cake, add a few toasted almonds and cover the mixture with another layer of cake slices. Repeat the process one more time and cover the top of the bowl with remaining cake slices. Make sure that the entire bowl is covered with the cake slices, sides, top and bottom.  Wrap tightly with the plastic wrap pressing down slightly.

Chill the Zuccotto for 2-3 hours, or overnight.

Unmold onto a cake plate or platter. Dust with cocoa powder, powdered sugar, or layer with additional whipped cream and toasted almond on top. Fresh fruit can also be added as decorations.


Handmade Pici with Fresh Tomato Sauce and Burrata

0 comments


Pici (Pinci) Pasta, Fresh Tomato Sauce, Burrata
Pici is a thick, hand rolled pasta, similar to fat spaghetti. 
It originated in the province of Siena in Tuscany.
In the Montalcino area, it is called pinci. 
This is hearty pasta best served with
 a spicy tomato sauce or rich meat sauce.

Handmade Pici (Pinci) Pasta
3 cups unbleached all-purpose flour
1 small egg, lightly beaten
1/4 teaspoon salt 
1 cup room temperature water, plus extra if needed 
Extra virgin olive oil and semolina flour for tossing 

Place the flour and salt in a bowl. Add the egg and stir in the water; if the dough does not gather around the spoon, add a little more water by the spoonful until a dough forms. Knead the dough for 5 minutes, or until very smooth and pliable; the dough should be somewhat soft but not sticky. Flatten into a disk and rub both sides with olive oil. Let rest, wrapped in plastic for 30 minutes or up to 3 hours at room temperature.

Rub a work counter with olive oil. Cut the dough into 1/2 inch wide strips and roll each into a long, thin rope, using the palms of your hands. Each rope should be 1/2 inch thick. Toss each rope as it is finished with a little semolina flour and place on a tray in curling nests until ready to cook (the pici can be held at room temperature, covered loosely with a dry kitchen towel, for up to 3 hours). If you find that the dough resists and/or sticks to the counter as you roll it out, rub the counter lightly again with olive oil.
Fresh Pici Pasta
Fresh Baby Tomato and Basil Sauce
3 tablespoons extra virgin olive oil 
2 cloves garlic, thinly sliced
Salt 
Freshly ground black pepper
Red pepper flakes
1 pinch cherry or grape tomatoes, cut in half lengthwise
Freshly torn basil leaves
2 fresh burrata, cut in halves for topping

In large skillet add the olive oil and sliced garlic; cook 30-45 seconds on medium-low heat.  Add tomatoes and raise the heat to medium-high. Season with salt and peppers. Allow tomatoes to cook undisturbed for few minutes before turning.  Cook 6-9 minutes more until tomatoes wrinkle and some are golden.  Taste for seasoning; adjust with salt as needed. When the sauce is ready, add in the fresh basil.

Assembling the pasta and sauce: Cook the pici in boiling salted water until al dente.  Strain well and return to pan. Mix a little sauce in the pan with the pici.  Gently fold. Serve in individual plates with a little sauce on top, fresh basil and ½ of a fresh Burrata mozzarella. A drizzle of aged balsamic, optional.  Serves 4.

Fresh Burrata

Blog Archive

 
  • Cooking Chef Show © 2012 | Designed by Rumah Dijual, in collaboration with Web Hosting , Blogger Templates and WP Themes